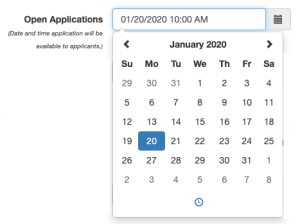
From the Grant Editor > Program Cycles > Applicant Access & Dates tab, you will determine all the settings that make a cycle visible to your applicants. After selecting Show to ensure that your cycle appears on the applicant’s Current Programs & Applications tab (unless you have an invitation code in place), you will see several date and time fields, as well as the option to offer all of the optional forms and elements, for the cycle. This section allows you to determine if and when each form or element of a single cycle will be available to applicants.
With the exception of Application dates and deadlines, which are mandatory for every cycle, you will select Yes to include each optional element of this section in your cycle. Each cycle can contain any of the following optional forms: Intent to Apply, Interim Report, and/or Final Report. Cycles can also include the optional Application Draft Review element. Note that your agency may not have the Intent to Apply or Interim Report features turned on. If you would like to offer these forms in your cycle, please reach out to a GO Smart team member.
Topics Covered in this Tutorial
USING THE NEW DROP DOWN DATE PICKERS
Date picker fields are always available for the Application, and will become available for all other elements after you select Yes from the “Offer…” drop down menu. Within the date picker field, click the calendar icon and select the date by clicking the day, month, or year along the top until you can click on your preferred date. Click the clock icon at the bottom of the date picker and click on the hour, minute, or AM/PM section to select your desired time. Clicking on the hour or minutes will offer more options. Alternatively, you can type your preferred date and time into the field manually, but it may not save unless it is typed in the correct format matching XX/XX/XXXX YY:YY ZM.
As always, this time is set to your agency’s time zone. If you don’t know which time zone has been selected for your agency, view the time displayed in the top right corner of your screen and verify it matches your current time.
GENERAL BEHAVIOR OF YOUR DATE AND TIME SETTINGS
The Open date and time for any form is the moment that form will be available to registered applicants of your GO Smart site. If the Intent to Apply and/or Draft Review are offered, either will automatically be available starting on your Application Open date and time. The Deadline date and time is the moment applicants will no longer be able to begin a new form or submit that form or element if they have already begun.
Forms are only available if the Open date is in the past and the Deadline date is in the future. As such, if you’re testing forms as an applicant, you’ll need to set the Open date to the past and Deadline date to the future; then only after you have completed your testing and reviewing should you set the dates appropriately for your applicants.
For any “Offer” drop down menu, you can select No where Yes was previously selected, and as long as you don’t click Save Changes, your previously entered dates will be restored by reselecting Yes.
Cloned cycles with any of the optional content set to Yes will retain those selections and copy the previous dates and times. Application Open and Deadline dates automatically advance by one year. All other dates are exact copies of the original. You can (and generally should) update these to the appropriate date and time for the cloned cycle.
APPLICATION SETTINGS
All cycles must have an application and as such you will always be tasked with setting the Open Applications and Application Deadline time and date. For initial cycles of a program, these dates and times are set to the exact moment of creation. If the cycle is a clone, these dates and times are advanced by one year from the cloned cycle’s dates and times. You can (and generally should) update these to the appropriate date and time for this cycle.
OPTIONAL FORMS AND ELEMENTS
INTENT TO APPLY SETTINGS
To offer an Intent to Apply in your cycle, you will select Yes from the “Offer Intent to Apply” drop down menu. After selecting Yes, the Intent to Apply will automatically be available starting on your Application Open date and time. You will see a red reminder message appear that reads Be sure to create your Intent to Apply page on the Cycle Pages editor! You will also see a single Deadline date picker field. If you are offering an Intent to Apply for the first time for this cycle, this date is set to the time you selected Yes. If this is a clone and the cycle previously included an Intent to Apply, the date will be set to the same date as the cloned cycle. In both scenarios, you can (and generally should) update this deadline to the appropriate date and time for this cycle. If your Intent to Apply deadline should be the same as the Application deadline, you will need to enter that same deadline date into the Intent to Apply deadline field. As the red message indicates, you will need to add an Intent to Apply page to the cycle from the Grant Editor > Cycle Pages editor.
AVOID FAILURES
If you set this drop down menu to Yes, but no Intent to Apply content exists, the cycle will appear broken and applicants will not be able to access your application. If you have Intent to Apply content but set this Offer ItA to No, your cycle will be inaccessible as well.
Just after the release of this new enhancement in January of 2022, you may find that you need to review your cycles with existing Intents to Apply to ensure that the new date field displays the appropriate deadline date, especially if you were previously using the Application deadline as the Intent to Apply deadline.
DRAFT REVIEW SETTINGS
To offer a Draft Review session for the application of this cycle, select Yes from the “Offer Draft Review” drop down. After selecting Yes, the Draft Review will automatically be available starting on your Application Open date and time. You must set a deadline for this feature, and as with the other dates, this will default to the date and time you selected Yes or will be the same date as the cloned cycle if the original also offered a Draft Review session.
DRAFT REVIEW FUNCTIONALITY
Between the date and time selected for Open Application and the Draft Review Deadline, applicants will see an additional option on the submission page of their application that allows them to submit a draft instead of their final version. If they choose this draft option, their status will become Draft Review and you can be notified of this by creating a status mailer or by proactively reviewing your grant manager dashboard. Once in draft review, you can review the application and make notes (outside of the system) of suggested changes. Applicants will also be able to access and modify their application while they’re status is Draft Review. After your review is complete, change the applicant’s status to Draft Review Complete and notify the applicant of your suggestions (again, outside of the system). They will be able to access their application, make your suggestions, and submit their final version, at which time their status will become Received.
INTERIM REPORT SETTINGS
To offer an Interim Report as part of this cycle, select Yes from the “Offer Interim Report” drop down. After selecting Yes, you will see a red reminder message appear that reads Be sure to create your Interim Report content on the Cycle Pages editor! You will also see an Open and Deadline date picker field. As with the other optional forms, you’ll need to create Interim Report content and set the appropriate open and deadline dates. Also similarly, the date will default to the time you select Yes or to the same time as the cloned cycle if the original included an Interim Report, and again, you’ll want to update these dates and times appropriately.
AVOID FAILURES
If you select Yes and do not create Interim Report content, your applicants in the Funded status will have access to the Final Report (if that content exists and Final Report dates and deadlines are set). If you select No and have Interim Report content, your applicants in the Funded status will not have access to the Interim Report or Final Report
FINAL REPORT SETTINGS
To offer a Final Report as part of this cycle, select Yes from the “Offer Final Report” drop down. After selecting Yes, you will see a red reminder message appear that reads Be sure to create your Final Report content on the Cycle Pages editor! You will also see an Open and Deadline date picker field. As with the other optional forms, you’ll need to create Final Report content and set the appropriate open and deadline dates. Also similarly, the date will default to the time you select Yes if it is the first time you’re offering a Final Report for this cycle or this clone. You’ll likely need to update these dates and times appropriately.
AVOID FAILURES
If you select Yes and do not create Final Report content or you do not set your Final Report dates and deadlines, your applicants in the Funded status (or Interim Report Approved, if you offer an Interim Report as well) will not be able to access the Final Report. Alternatively, if you create Final Report content but set the Offer setting to No, the applicant will not be able to access the FR content and they will see date errors on the CP&A


